
Table of Contents
Understanding Spot Tuckpointing
Spot tuckpointing is a precise masonry repair method that selectively replaces damaged mortar in small, isolated areas rather than repointing an entire wall. This targeted approach saves time and money while addressing minor deterioration before it worsens.
Unlike full brick repointing, spot tuckpointing focuses only on failing areas. According to the Brick Industry Association, proper joint preparation and compatible mortar are crucial for lasting repairs. By tackling localized damage early, homeowners can prevent more extensive structural issues and avoid higher costs down the road.
Equally important is mortar color matching for a seamless look. Our spot tuckpointing color matching process ensures new mortar blends invisibly with existing brickwork, preserving your home’s curb appeal.
Whether you need chimney repair or waterproofing, our team can provide a detailed assessment and a custom quote. Contact us today to Get A Quote and let us enhance the appearance and improve the integrity of your property.
Preparing for Spot Tuckpointing
Now that you understand what spot tuckpointing involves, let’s walk through how to prepare for the job. Proper preparation is essential in spot tuckpointing to ensure the repair blends seamlessly and lasts for years.
Start by inspecting the mortar joints closely. Look for cracks, crumbling sections, or areas where mortar has fallen out completely. If the damage is widespread, brick repointing of the full wall may be more appropriate than a targeted mortar repair.
Next, clean the joint thoroughly using a wire brush to remove all loose debris and dust. This step is critical for strong adhesion. The Brick Industry Association recommends a joint depth of at least 2.5 times the joint width for proper bonding. Always wear safety glasses and gloves during this stage, and protect nearby windows and doors from grinding tools.
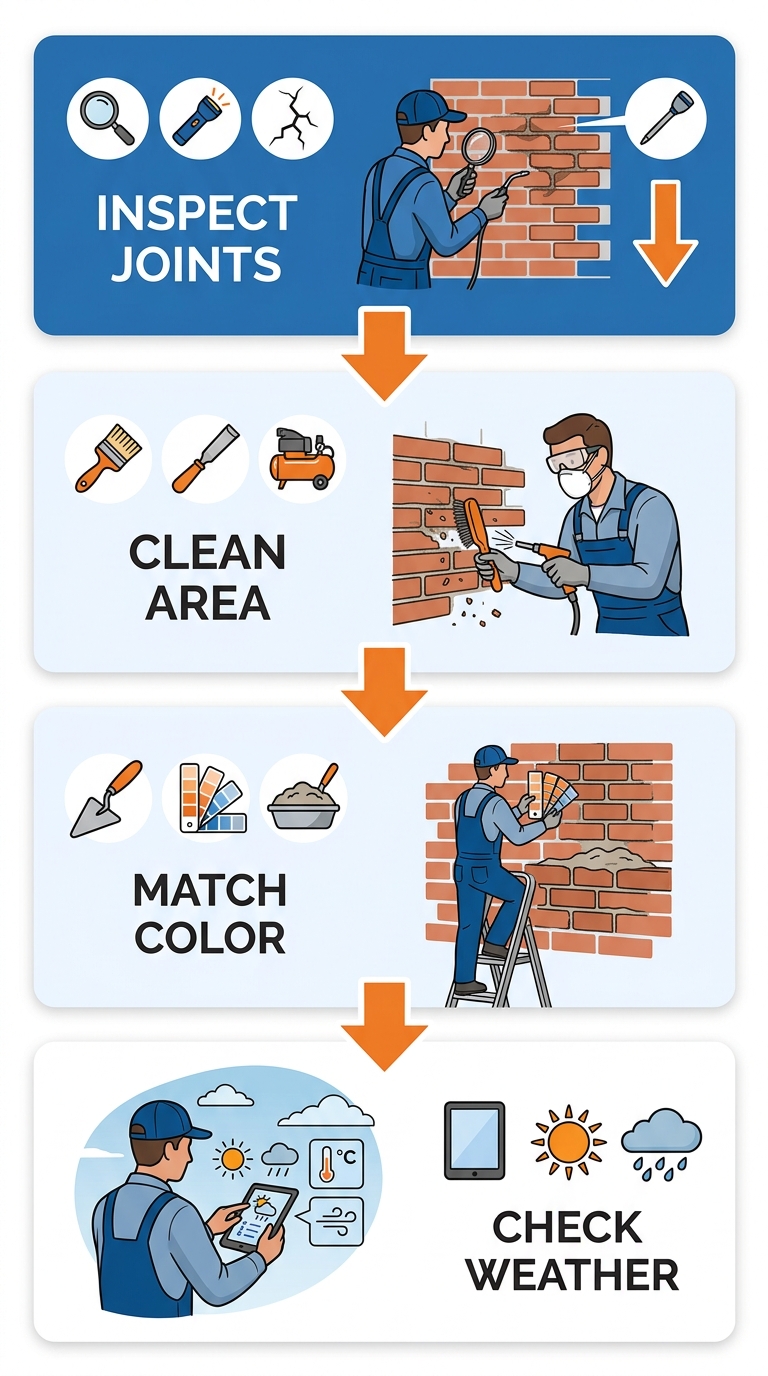
Four-step preparation process for spot tuckpointing
Mortar color matching is perhaps the most important detail. A mismatched joint will stand out immediately, ruining the appearance of the wall. We specialize in achieving an exact color blend so the repair becomes virtually invisible.
Finally, check the weather forecast. Avoid working when temperatures drop below 40°F or rain is expected within 24 hours. Taking your time with preparation makes all the difference for a lasting, attractive result. If you prefer a complete solution, consider our solid tuckpointing service for thorough, long-lasting results.
Inspect Your Brickwork for Damage
Before you fix your brickwork, you need to know what to look for. Regular inspections catch small problems before they become big repairs. We recommend walking around your property twice a year to check these common trouble signs:
- Cracked or missing mortar: Look for gaps wider than 1/4 inch or sections where the mortar has fallen out completely.
- Spalled bricks: Check for bricks that are flaking, crumbling, or have faces that have popped off.
- Crumbly mortar: Gently probe the joints with a screwdriver. If it easily scrapes away, the mortar has lost its strength.
- White powder: A white, powdery residue called efflorescence signals moisture is moving through the wall, which can lead to bigger problems.
- Key areas: Pay close attention around chimneys, windows, and building corners, where damage often starts first.
Small problem areas may only need spot tuckpointing instead of a full brick repointing job to restore the wall. If your inspection reveals these issues, reach out to our team for reliable masonry services St. Louis. With over a decade of experience, we aim to enhance the appearance and improve the integrity of your house or building.
Decide Between Spot Repair and Full Restoration
Once the signs of mortar damage are clear, the next question is whether a targeted spot tuckpointing repair or a full restoration is appropriate. Spot repair is best for isolated, minor mortar damage where the surrounding masonry remains sound and intact, while full restoration is necessary when deterioration affects large areas or multiple walls.
Color matching is critical for spot repairs to blend new mortar with existing, older mortar. Our spot tuckpointing & color matching service ensures a seamless finish. Building age also matters: historic or older structures may require full restoration to preserve structural integrity, whereas newer buildings might benefit from selective brick repointing. For budget-conscious solutions, we also offer in-house financing.
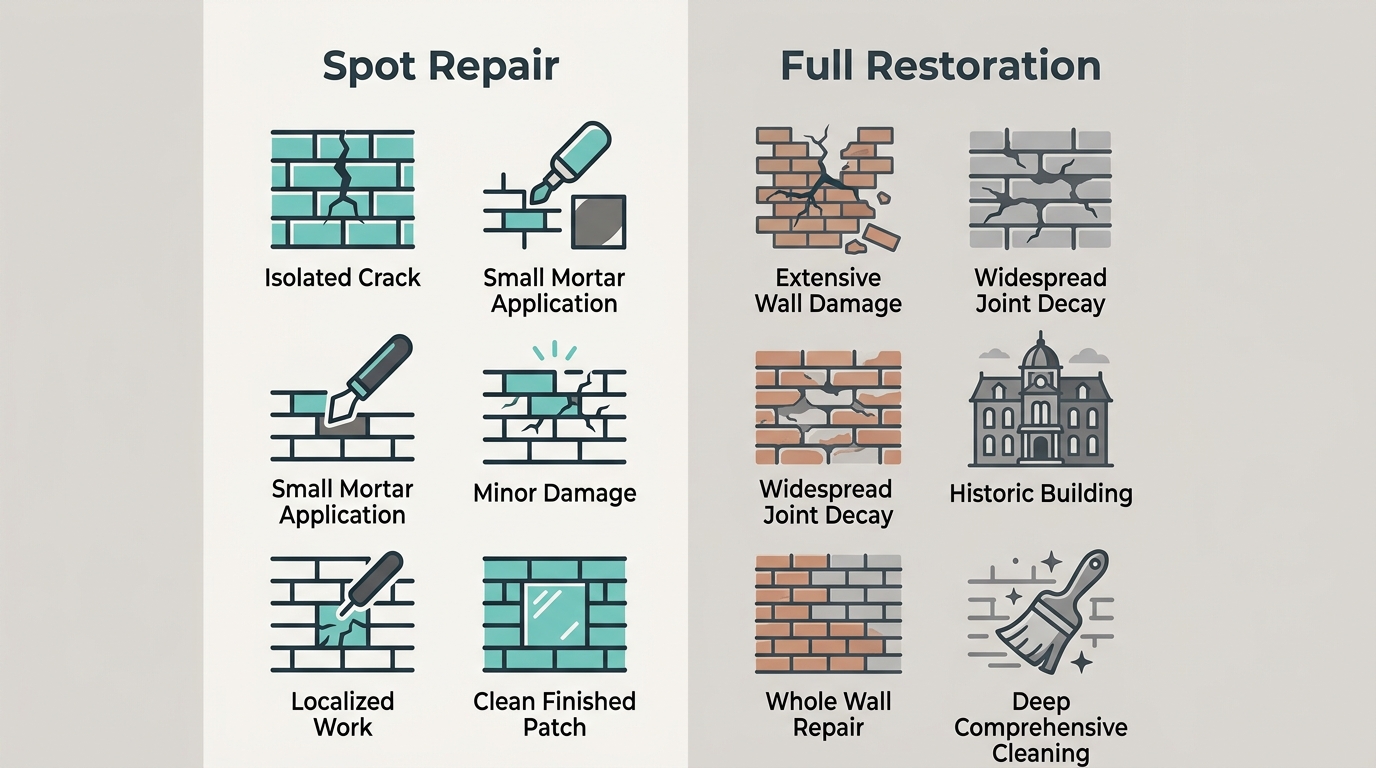
Compare spot repair against full restoration for your masonry needs
We aim to enhance the appearance and improve the integrity of your house or building. For a personalized recommendation, contact a trusted St. Louis tuckpointing company like B&G Tuckpointing. We Service Tuckpointing Clients Nationwide & Offer In-House Financing! Reach out to Get A Quote for a custom assessment today.
Choose the Right Mortar and Match the Color
Beyond structural reinforcement, a seamless look requires the right materials. We aim to enhance the appearance and improve the integrity of your house or building through precise spot tuckpointing. That begins with expert mortar selection and color matching.
Mortar Type Matters
The Brick Industry Association matches mortar strength to brick hardness. Type N suits soft historic brick, Type S handles moderate use, and Type M is for hard brick. Cement-rich Type M on old soft brick causes spalling. Proper brick repointing preserves walls by matching compressive strength.
Color Matching Precision
Mortar color matching blends iron oxide pigments with aggregate fineness adjustments to replicate original hues. We recommend a test patch; wet mortar looks darker, so let it cure fully. Spot tuckpointing success hinges on this precision.
With 20 years of expertise, B&G delivers color-matched results. Our mission is to provide residential and commercial customers with outstanding service. For large projects in St. Louis, trust our commercial masonry services St. Louis to maintain uniform appearance. We Service Tuckpointing Clients Nationwide & Offer In-House Financing! Get A Quote for a custom assessment tailored to your brickwork.
Remove the Damaged Mortar Carefully
Once you have identified the damaged areas, the next critical step in spot tuckpointing is to remove the old mortar with care. Rushing this phase can chip surrounding bricks, so precision is essential for successful brick repointing.
According to the Brick Industry Association, remove mortar to a depth of at least 2/3 the brick thickness or 3/4 inch. Use a mortar grinder or hammer and chisel, angling tools downward to avoid chipping brick edges. Always wear safety glasses and a dust mask, and control dust with a spray bottle of water.
Focus on joints that are crumbling or missing, and do not over-widen good joints. After removal, vacuum out all dust to ensure proper adhesion. This prep work lays the foundation for precise mortar shade matching when applying fresh material.
What if this project feels too complex? Submit a masonry quote request and let our team enhance the appearance and improve the integrity of your house or building. After clearing all loose mortar, you are ready to mix fresh mortar and begin repointing.
Apply Fresh Mortar to the Repaired Area
Once the joints are clean and properly prepared, you’re ready to apply fresh mortar. When performing spot tuckpointing — a targeted form of brick repointing — achieving the right mortar consistency is essential. We mix the mortar to a dry, crumbly state that holds its shape when pressed but still contains enough moisture to bond firmly with the surrounding brick. Using a tuckpointing trowel, press the mortar deep into the joint in thin layers, filling completely to avoid air pockets.
After filling, strike the joint with a concave, vee, or flush jointer to match the existing profile. For a seamless repair, mortar color matching is crucial — we either use pre-blended mortar or carefully adjust pigment until the shade blends with the surrounding joints. Immediately brush away any smears on the brick face with a soft brush before the mortar sets, typically within 30-60 minutes. Avoid overworking the fresh mortar, as this can weaken the bond or lighten the color.
For a lasting repair, allow the finished joints to cure properly.
Tool and Shape the Mortar to Blend In
Once the mortar is applied and has set to a thumbprint-hard consistency, we’re ready to tool and shape the joints so they blend in with the surrounding brick. In spot tuckpointing, this step is what makes the repair invisible. After the initial set, it’s all about profiling the joint to match the existing brickwork exactly — a process central to successful brick repointing.
We select a jointer tool that mirrors the original joint profile, whether it’s a concave, V, or flush shape. Working in small sections, we strike the mortar when it’s just firm enough to take an impression without smearing or crumbling. Our goal is to achieve precise depth, width, and shape without over-tooling, which can darken the surface and ruin the blend. The mortar color matching we did at the mixing stage now pays off, as the newly tooled joint harmonizes with the surrounding mortar rather than standing out.
After tooling, we lightly brush the joint with a soft bristle brush to replicate the texture of the original mortar. The result is a seamless joint that preserves the wall’s visual continuity and structural integrity, making the repair nearly impossible to detect.
Cure the Repair and Apply Waterproofing
Once we complete spot tuckpointing repairs, the curing phase begins. After brick repointing, the new mortar needs 24 to 48 hours of undisturbed curing–temperature and humidity can affect this timeline. During this period, the mortar gains strength and bonds securely to the surrounding brick. Our mortar color matching during the repair ensures an attractive finish, but proper curing is what locks in that color and integrity.
Once the mortar has fully cured, we apply a professional-grade waterproofing sealant. This breathable yet durable barrier protects the newly restored joints from moisture penetration, freeze-thaw damage, and staining. At B&G Tuckpointing, we aim to enhance the appearance and improve the integrity of your house or building, and waterproofing is a critical step that extends the life of the masonry work. Ready to protect your investment? Get A Quote today and let our 20 years of experience work for you.
Troubleshooting Common Spot Tuckpointing Issues
Even with careful application, issues can occasionally arise during spot tuckpointing. Knowing how to identify and resolve them quickly helps maintain both the look and long-term performance of your brickwork.
One common concern is a mortar color mismatch. This often happens when the new mix doesn’t replicate the original sand, cement, and pigment ratios. The Brick Industry Association’s technical guidelines stress testing small batches on a concealed area first. For spot tuckpointing projects, we add pigments gradually while the mortar is wet and compare it to a cleaned section of the original joint to achieve accurate mortar color matching.
Poor adhesion is usually traced to inadequate joint preparation. If dust or crumbling old mortar remains in the joint, the new material can’t bond securely. During brick repointing, we grind out deteriorated mortar to a consistent depth–typically at least 3/4 inch–and then rinse the joint thoroughly so the fresh mix grips the surrounding brick.
Cracking or crumbling often points to curing trouble. Mortar needs 24 to 48 hours of controlled moisture to reach proper strength. On hot or windy days, rapid drying draws water out of the mix too quickly. Lightly misting the repaired area with water during the first day keeps moisture in place and significantly reduces early-stage cracking.
Texture and color can also shift if a sand or mix type differs from the original. Matching the aggregate size and binder type preserves visual continuity and ensures the repair moves with the surrounding masonry through freeze-thaw cycles.
We aim to enhance the appearance and improve the integrity of your house or building. When a spot tuckpointing repair doesn’t behave as expected, reaching out to an experienced team keeps the fix on track and protects your investment.
Extend the Life of Your Masonry with Spot Tuckpointing
Spot tuckpointing provides a targeted way to maintain masonry structures, addressing only the joints where mortar has begun to fail. We believe this focused approach is a proactive step in preserving both the appearance and strength of brickwork. By removing and replacing deteriorated mortar in isolated areas, we prevent small problems from escalating. According to industry best practices from the Brick Industry Association, properly maintained mortar joints are critical to a wall’s long-term durability.
Beyond full repointing, spot tuckpointing offers a cost-effective way to defend your brickwork against water infiltration. When mortar cracks or crumbles, moisture seeps in, eventually leading to freeze-thaw cycles that can cause bricks to spall or shift. Timely selective mortar repair interrupts this cycle and safeguards structural integrity. We focus on precise mortar color matching, using the original sand, pigment, and mix proportions so the fresh repair blends seamlessly with the surrounding brick. We aim to enhance the appearance and improve the integrity of your house or building while maintaining the character you love.
Our team has served properties across St. Louis, MO and nationwide for over a decade, delivering color-matched repairs that last. If you notice cracked or crumbling mortar, we encourage you to request a custom quote so we can address the issue before it worsens. Get A Quote.