
Table of Contents
Understanding Crumbling Mortar Repair
Understanding crumbling mortar repair begins with recognizing that what once held your brickwork together can weaken over time. Crumbling mortar is deteriorated, weakened mortar that has lost its structural integrity, leaving your masonry vulnerable to the elements and ongoing damage.
Why Mortar Crumbles
The most common causes of crumbling mortar are long-term weathering from freeze-thaw cycles, natural aging as mortar approaches its typical 20-to-30-year lifespan, and poor initial installation with an inadequate mix or insufficient joint depth. When moisture penetrates the porous material and freezes, it expands and gradually breaks the mortar apart from within.
How do you know it’s time for brick tuckpointing? Look for these visible signs:
- Cracked, crumbling, or missing mortar joints between bricks.
- A powdery residue that appears when you touch the mortar.
- Loose or shifting bricks with visible gaps forming around them.
The risks of leaving these signs unaddressed go beyond appearance. Water seeping into the wall can cause interior damage, mold growth, and brick spalling. Over time, structural stability declines, and your property’s curb appeal suffers.
Repointing brickwork–often called professional tuckpointing–is the recommended repair technique to restore mortar integrity. This process involves carefully removing the deteriorated mortar to a proper depth and filling the joints with fresh material that matches the original in strength and color. According to the International Masonry Institute, industry standards for mortar joint repair emphasize selecting the right mortar mix and maintaining appropriate joint profiles to ensure a lasting result. The Brick Industry Association’s technical guidelines further confirm that correct mortar selection and joint preparation are essential for long-term brickwork performance.
Once you recognize the warning signs, addressing the problem promptly with a professional solid tuckpointing service ensures the long-term integrity of your brickwork. Our team at B&G Tuckpointing brings two decades of experience to every crumbling mortar repair, helping property owners nationwide maintain safe, attractive masonry.
The Fundamentals of Mortar Deterioration and Repair
Before diving into specific repair methods, it’s important to understand why mortar fails. If you’ve noticed powdering joints or are concerned about the need for crumbling mortar repair, you’re not alone–this is one of the most common issues we see in brick structures. At B&G Tuckpointing, our team has spent over two decades diagnosing these problems, and our goal is to help you understand exactly what’s happening to your masonry.
Several factors contribute to mortar deterioration over time. The most aggressive is the freeze-thaw cycle, where moisture seeps into the porous mortar, freezes and expands, then thaws, causing the joints to crack and crumble from the inside out. Age itself is another culprit; over the years, the chemical binders that give mortar its strength naturally break down, a process accelerated by exposure to the elements. Finally, we often encounter issues that stem from the very beginning–a poorly mixed original mortar or improper application during construction can doom the joints to an early failure. According to the Brick Industry Association’s technical notes on mortar repair, using a mortar mix that is harder than the surrounding brick unit is a leading cause of damage, as it traps moisture and forces deterioration into the brick itself rather than allowing it to exit through a softer, sacrificial mortar joint.
You can identify failing mortar by several clear warning signs. Look for joints that are visibly crumbling or have reduced to a sandy powder. You might notice distinct cracks or gaps forming between the bricks, or a white, chalky substance called efflorescence on the surface of the brickwork–a telltale sign of water moving through the wall and depositing salts. In severe cases, individual bricks will even begin to feel loose. When you see these signs, the structural integrity of the entire wall is compromised, and professional repair becomes essential.
The two primary methods for addressing these issues are repointing and tuckpointing, and understanding the difference between them is key to choosing the right fix for your property.
Repointing vs Tuckpointing: Key Differences
The following table clarifies the two primary professional approaches to mortar repair, helping you identify which service your property needs based on the condition of your mortar joints.
| Aspect | Repointing | Tuckpointing |
|---|---|---|
| Primary purpose | Structural restoration | Aesthetic and structural refinement |
| Mortar removal depth | Typically 1/2-1 inch deep | Shallow removal, filled with matching mortar |
| Appearance outcome | Uniform, clean joints; color may vary | Fine lines mimicking tight joints; highly precise |
| Best application | Widespread mortar deterioration | Historic or high-visibility masonry |
| Cost consideration | Varies; custom quote needed | Varies; custom quote needed |
Repointing is strictly a structural process. It requires grinding out the deteriorated mortar to a proper depth–the 1/2 to 1 inch recommended by the Brick Industry Association–and packing the joint with new, compatible mortar to restore the wall’s strength and weather resistance. This is the go-to method when you have widespread crumbling that threatens the stability of the brickwork. Tuckpointing, on the other hand, shares the structural goal of joint filling but adds a layer of aesthetic refinement, making it the standard for highly visible or historic masonry as trained by the International Masonry Institute. After the old mortar is removed, the joint is filled flush with a color-matched base mortar. A thin, contrasting line of lime putty or a similar material is then applied down the center of the joint, creating the optical illusion of perfectly straight, narrow brickwork.
Choosing the wrong approach can cause more harm than good. If a contractor merely tuckpoints over deeply damaged mortar without achieving the necessary removal depth, the structural problems will quickly return beneath the cosmetic surface. This is why a professional assessment is so important. At B&G Tuckpointing, we offer both solid tuckpointing–which is our term for a full repointing–and spot tuckpointing with expert color matching for targeted or aesthetic repairs. We aim to enhance the appearance and improve the integrity of your house or building with the right solution for the specific problem.
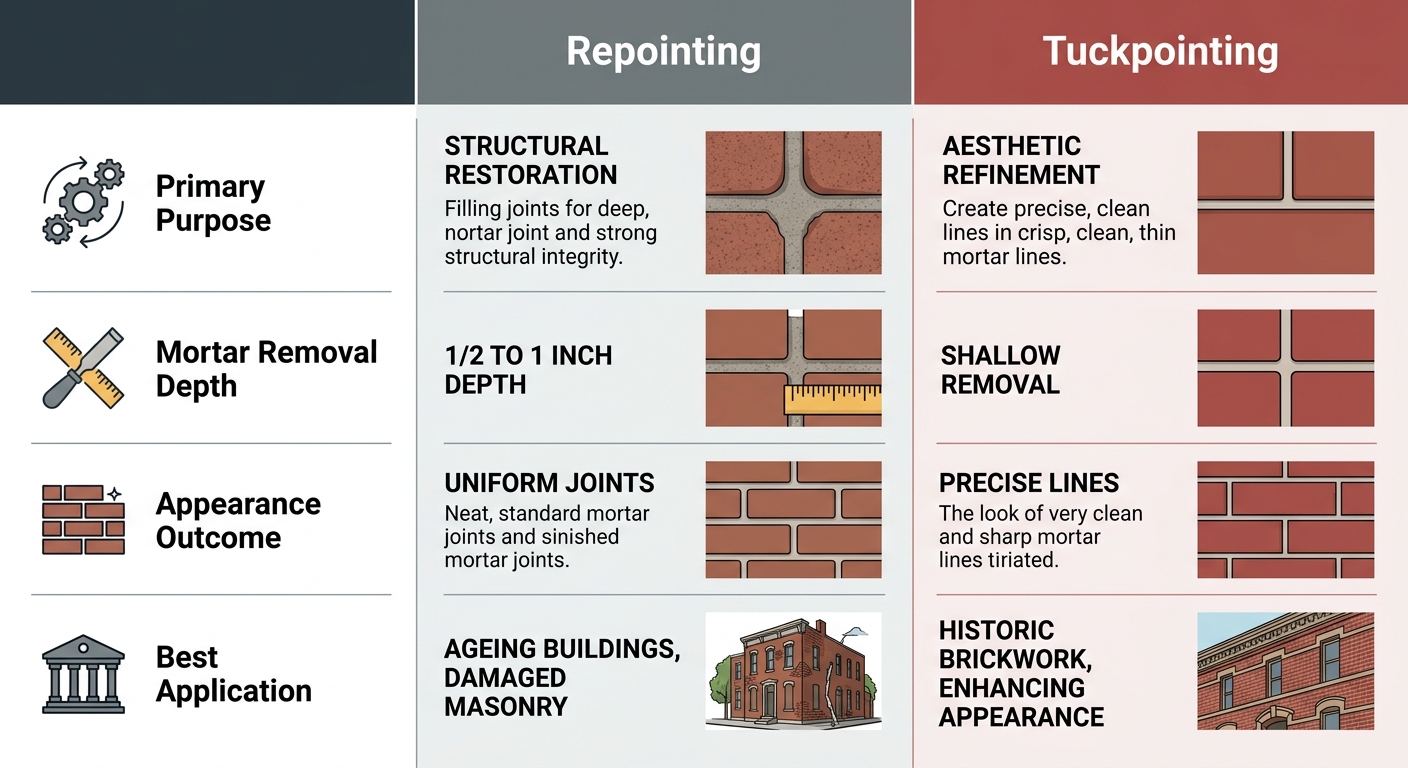
Tuckpointing vs. repointing comparison infographic
Now that you know the difference between repointing and tuckpointing, choosing the right method comes down to the condition of your mortar and your aesthetic goals. When repointing brickwork is required, deep mortar removal is non-negotiable for long-term durability. If you are seeking a finish that makes your brick joints look crisp, new, and historically accurate, a full brick tuckpointing project is the ideal path. Whichever service your property needs, a trusted tuckpointing contractor can perform a thorough assessment and recommend a repair that will protect your home for decades. Understanding these fundamentals empowers you to make an informed decision, ensuring your next masonry repair is both durable and beautiful.
Inside the Professional Crumbling Mortar Repair Process
Once you understand why mortar fails, let’s look at how professionals actually fix it. A proper crumbling mortar repair is never a simple patch job–it’s a meticulous, multi-stage process that restores both the beauty and structural integrity of your masonry. At B&G Tuckpointing, our nationwide team follows a proven three-step approach on every project: site preparation and precise mortar removal, careful application and tooling, and expert color matching for a seamless finish. We aim to enhance the appearance and improve the integrity of your house or building with every joint we restore.
Site Preparation and Mortar Removal Depth
Before any old mortar is touched, properly containing the work area is essential to protect your property. Our crews prepare the site by taping plastic sheeting over windows and doors, spreading heavy-duty drop cloths across the ground, and setting up HEPA-filtered vacuums to control silica dust at the source. This proactive containment ensures the surrounding landscape and interior spaces remain clean throughout the project.
Once the area is secured, the careful work of removing the damaged mortar begins. According to technical guidelines from the International Masonry Institute (IMI), the standard best practice for repointing brickwork is to cut out the old mortar to a depth that is 2 to 2.5 times the width of the joint. For a typical 3/8-inch joint, this means grinding out approximately 3/4 of an inch of material. This specific depth creates a strong mechanical key, giving the new mortar enough surface area to bond securely with the brick.
Removing mortar to this precise depth without damaging the surrounding soft brick requires a specialized skill set. Our technicians use thin diamond-grinding blades and light hammer taps to carefully slice and clear each joint. After the bulk material is removed, the joints are thoroughly cleaned with compressed air or a final vacuum pass, leaving a dust-free, roughened surface perfectly prepared for the new mortar.
Mortar Application, Tooling, and Curing
With the site prepared and old mortar removed, we move to the application stage. This phase begins long before a trowel touches the wall, because matching the physical properties of the original mortar is critical for a lasting brick tuckpointing repair. The mortar’s compressive strength must be compatible with the existing masonry unit–typically, a Type N mortar is selected for softer, historic bricks, while a harder Type S mix may be appropriate for modern, high-strength brick. Using a mix that is harder than the brick itself is a major cause of future cracking, so we always let the brick’s character dictate the recipe.
The fresh mortar is packed into the cleaned joints in thin layers, known as lifts, to prevent air pockets and ensure a dense, weather-resistant fill. After the mortar firms up to a “thumbprint” consistency–dry enough not to smear but pliable enough to shape–we use specialized jointer tools to strike the joint. This crucial tooling step compresses the mortar, forcing it tightly against the brick edges and shaping it to replicate the original joint profile, whether that’s a concave, V-groove, or weathered style.
Finally, the new mortar must cure properly to reach its full strength. Following BIA technical standards, we keep the repaired areas damp for 2 to 3 days by intermittently misting the wall with water or hanging damp burlap. This moist-curing process is especially vital in warm or windy conditions, as it prevents the mortar from drying too quickly, which can lead to shrinkage cracks and a weak bond.
Color Matching and Finishing for a Seamless Look
A structurally sound repair must also be visually invisible, which is where expert color matching becomes essential. For mortar restoration on older structures, reaching the perfect hue is both a science and an art. Our team begins by analyzing a sample of the original mortar to identify the base sand color and any aggregate tones already present.
From this analysis, we create several small test batches by precisely blending pigments–often iron oxide for warm tones or carbon black for grays–into a matching sand-and-cement base. These samples are then applied to an inconspicuous portion of the wall and allowed to cure. The BIA’s guidance on pigment blending highlights that mortar can change dramatically as it dries, so we evaluate the color match only after the samples are fully cured. For spot repairs on decades-old brick, we often add a subtle aging tint to the mix, which helps the new section blend invisibly with the patina built up over years of weather exposure.
The finishing touch goes beyond color to include texture. Using a series of stiff brushes and specialized tuckpointing irons, we dress the surface of the joint to replicate the aggregate exposure and sandy grain of the surrounding mortar. When the job is complete, the repaired area should be indistinguishable from the original wall, with the restored strength hidden beneath a seamless finish.
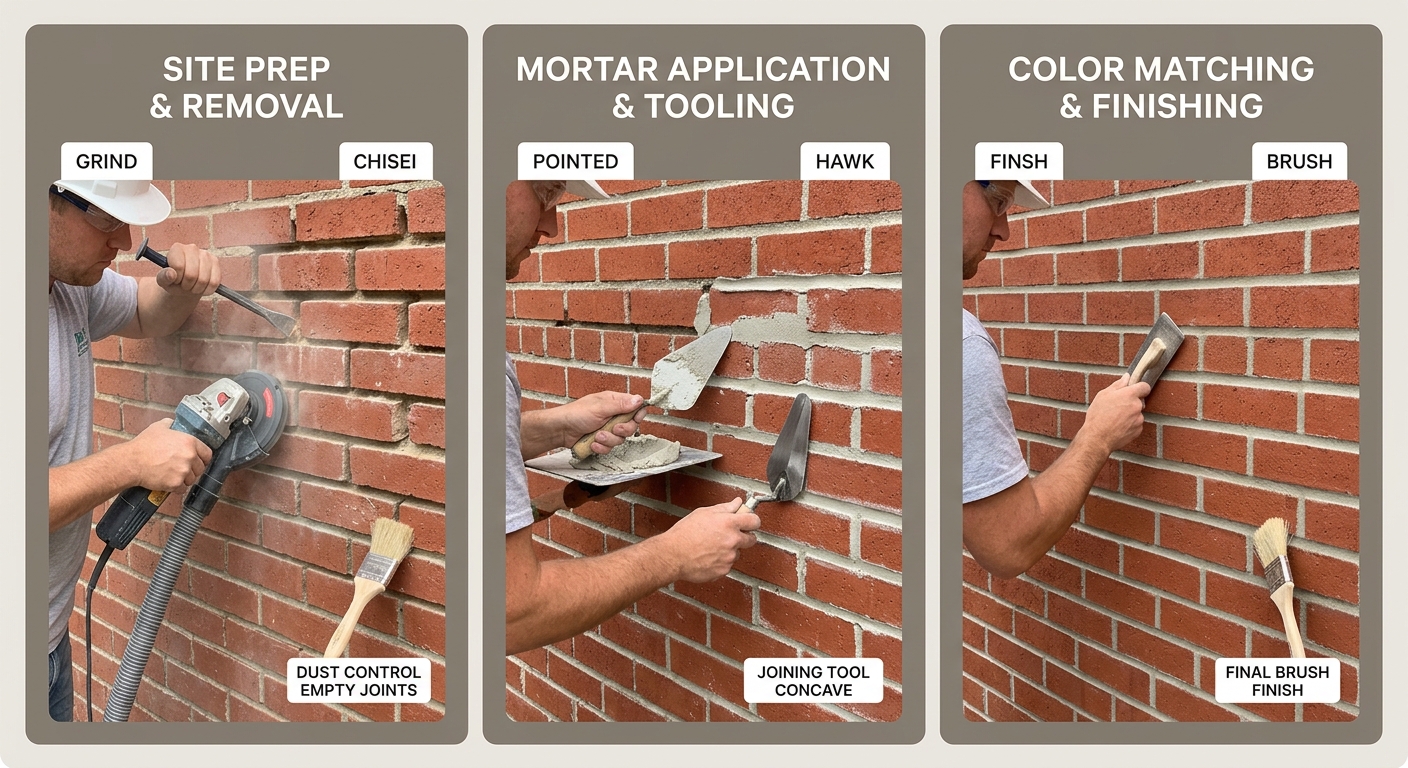
Professional mortar repair process illustration
Now that you understand the care and precision that goes into a proper restoration, you can see why different situations call for different scopes of work. If you are leaning toward a full restoration, read more about our solid tuckpointing process–otherwise, to help you decide between the two primary approaches, see the comparison below.
| Feature | Solid Tuckpointing | Spot Tuckpointing |
|---|---|---|
| Scope of work | All mortar joints on a wall or structure | Only joints with visible damage |
| Best for | Uniform restoration, whole-wall projects | Targeted repairs, budget-conscious updates |
| Color matching approach | Single batch matched to original mortar | Custom color match for each repaired area |
| Typical duration | Longer, covers entire surface | Focused, often same-day completion |
| Cost expectation | Custom quote based on sq ft | Custom quote based on linear ft of damage |
We Service Tuckpointing Clients Nationwide & Offer In-House Financing! No matter which approach you choose, you can trust that B&G’s two decades of masonry experience will be brought to bear on your project, restoring both character and stability to your brickwork.
Choosing Between DIY and Professional Masonry Repair
When facing crumbling mortar repair, homeowners often wonder whether to grab a trowel and tackle the job themselves or call in experienced professionals. It is a fair question, and the answer depends on several important factors that we will explore together. Understanding what is at stake–both structurally and financially–can make the decision much clearer. Let’s walk through the tools, the assessment process, and the long-term value so you can make the best choice for your home.
Tools of the Trade: What Professionals Know That DIYers Often Overlook
Achieving a lasting mortar repair goes well beyond buying a bag of mix and a basic trowel. Professional brick tuckpointing requires specialized tools many DIYers lack, and knowing how to use them makes a measurable difference in the quality of the job. A mortar joint raker and an angle grinder with a diamond blade, for example, allow trained crews to remove deteriorated mortar to a uniform depth. According to the International Masonry Institute, professionals maintain a consistent joint depth of 1/2 to 1 inch, which is critical for optimal bonding strength and long-term performance.
After removal, the right finishing tools shape the new mortar to match the surrounding joints and shed water effectively. A pointing trowel, a concave jointer, and a high-efficiency vacuum for dust control are standard on a professional truck but rarely found in a homeowner’s garage. The Brick Industry Association notes that selecting the proper mortar type–N, S, or O–and mixing it to match the existing brick’s compressive strength and color is a trained judgment call that most pre-bagged mixes cannot replicate. When you see a finished wall where the joints disappear seamlessly, that is the result of the right equipment and the practiced hand behind it.
DIY vs Professional Mortar Repair: What to Consider
The following table helps weigh the key trade-offs between doing the work yourself and hiring a professional crew.
| Factor | DIY Repair | Professional Repair |
|---|---|---|
| Skill level required | Basic masonry knowledge | Advanced masonry expertise |
| Mortar removal depth control | Risk of over-removal or brick damage | Precise, consistent depth by trained crew |
| Mortar selection and mixing | Limited; pre-bagged mixes common | Custom blend matched to original mortar strength and color |
| Weather and curing management | May be affected by temperature/humidity | Controlled timing and protection during cure |
| Longevity of repair | 5-10 years with ideal conditions | 15-25+ years with professional materials and technique |
| Cost | Material cost only; time investment | Custom quote; includes labor, materials, warranty |
This side-by-side view makes it easier to see where professional expertise pays off. While a DIY approach minimizes upfront cost, the materials, skill, and curing control that come with a professional repair are designed to deliver results that last two to three times longer.
Assessing Your Home’s Needs: When DIY Makes Sense and When It Doesn’t
Before climbing a ladder or opening a bag of mortar, take a few minutes to honestly evaluate your situation. We recommend working through a simple five-step checklist that helps you decide whether the project is a good fit for your skills and schedule. Start by inspecting the brick joints and looking for cracks wider than 1/4 inch; anything larger often signals deeper structural movement and is a job best left to a professional.
Next, measure the total area of damaged mortar. Small patches under 10 square feet, like a single window sill or a section of garden wall, are typically DIY-friendly for someone with basic masonry experience. The classic screwdriver test is also revealing–gently press the tip into the mortar and see if it crumbles easily; if it does, you are likely dealing with damage that runs deeper than the surface layer. Safety matters equally: any work above ground level calls for proper scaffolding and a safety harness, not just a borrowed extension ladder. Finally, watch the weather forecast and avoid days with freezing temperatures or high humidity, which can ruin the curing process and leave you with a weak repair.
Long-Term Value of Professional Repair: Lifespan and Structural Benefits
Choosing a professional masonry repair is not just about fixing what is broken today; it is an investment in how your home performs for years to come. Proper repointing brickwork extends the life of a structure by decades, and the technical standards followed by experienced crews are a big reason why. The International Masonry Institute emphasizes that controlled curing conditions and precise joint preparation allow the new mortar to bond fully with the surrounding brick, preserving the wall’s structural integrity against moisture and freeze-thaw cycles.
We have seen professional repairs last 15 to 25 years or more, while a typical DIY repair under ideal conditions may hold up for five to ten years. Those extra years add up quickly when you factor in the cost and disruption of redoing the work. Beyond longevity, a professional job includes a level of accountability that a weekend project simply cannot offer. B&G’s mission is to provide residential and commercial customers with an outstanding level of service, and that commitment is backed by a warranty on our work–something no bag of mortar can promise. If you decide professional repair is right for you, search for tuckpointing near me to find experienced contractors who will treat your home like their own.
Advanced Considerations in Masonry Restoration
Now that we understand how mortar breaks down, let’s examine the advanced structural problems that can develop–and how tuckpointing keeps them at bay. While minor cracks might seem cosmetic at first, ignoring them can lead to serious damage that compromises your entire building’s safety. Advanced masonry restoration, particularly professional crumbling mortar repair, is a proactive strategy that saves you from expensive emergencies down the road.
Water intrusion and freeze-thaw damage are among the most common concerns. In climates like St. Louis, water trapped in mortar voids expands when it freezes, cracking bricks and accelerating deterioration. According to guidelines from the International Masonry Institute, proper water management is essential for masonry longevity. Through careful repointing brickwork, we fill those voids and restore water-resistant joints that keep moisture out of the wall assembly.
Weakened masonry also loses lateral stability, which can contribute to foundation settlement or shifting. As mortar crumbles, the wall assembly loses its structural continuity, placing uneven stress on the foundation below. In brick tuckpointing, we restore that continuity by replacing deteriorated joints with fresh, high-strength mortar. This reinforcement helps the entire wall system resist movement and maintain stability for years to come.
Spalling brick faces and pest entry are two additional problems that stem from deteriorated mortar. Excess moisture absorbed through failing joints causes brick surfaces to flake and pop off, while gaps in mortar provide easy access for insects and rodents. Sealing those joints prevents further water absorption and eliminates those unwanted entry routes. If bricks have already spalled, our brick rebuilding services can replace damaged units and fully restore the wall’s structural integrity.
The following table highlights how tuckpointing directly addresses each of these issues:
| Structural Issue | Connection to Mortar Deterioration | How Tuckpointing Helps |
|---|---|---|
| Water intrusion and freeze-thaw damage | Crumbling mortar allows water to enter walls | Fills voids and restores water-resistant joints |
| Foundation settlement or shifting | Weakened masonry loses lateral stability | Restores structural continuity of the wall assembly |
| Spalling brick faces | Excess moisture in bricks causes surface flaking | Prevents further water absorption into bricks |
| Insect and pest entry | Gaps in mortar provide access points | Seals joints, eliminating entry routes |
By addressing these advanced concerns early, you avoid the cascading effects that neglected mortar can cause. We aim to enhance the appearance and improve the integrity of your house or building, and our team approaches every project with that goal in mind. B&G’s mission is to provide residential and commercial customers with an outstanding level of service, whether we’re handling minor repointing of brickwork or a full-scale structural restoration.
With these advanced concerns in mind, we can appreciate why professional tuckpointing is more than just cosmetic. Next, we’ll walk through our step-by-step process for restoring your masonry. Ready to protect your property? Contact us to Get A Quote today.
Frequently Asked Questions About Mortar Repair
What is crumbling mortar repair?
Crumbling mortar repair restores deteriorating mortar joints in brick structures, often through tuckpointing or repointing. It’s the first line of defense against water intrusion and continues to be the best way to preserve your wall’s strength. If you’re dealing with crumbling mortar repair in St. Louis or anywhere around the country, early intervention prevents costly brick replacement down the road.
Can I repair crumbling mortar myself?
While small touch-ups are possible, matching historic mortar color and achieving full-depth bonding takes trained eyes and hands. Our brick tuckpointing process uses custom color-matching and proper tooling to maintain structural integrity. With 20 years of experience, we’ve seen countless DIY patches fail–professional tuckpointing ensures the repair blends with your existing brick and actually stops moisture.
How long does mortar repair last?
A correctly executed repointing of brickwork lasts for decades when masonry is kept dry and maintained. By cutting out old mortar to the right depth and compacting new mortar in lifts, our crew delivers a weather-resistant joint. Routine inspections and prompt caulking help extend that lifespan even further, keeping your building’s envelope intact.
How much does mortar repair cost?
Cost depends on the extent of damage, materials, and location. We provide custom quotes tailored to your project–contact us to Get A Quote for your specific repair. Every estimate is based on actual field conditions, not generic price sheets, so you only pay for what your masonry needs.
To learn more about your specific project, Get A Quote from our team. We Service Tuckpointing Clients Nationwide & Offer In-House Financing!
Preserving Your Masonry for Years to Come
Long-term masonry preservation is your most effective defense against crumbling mortar repair headaches down the road. Professional brick tuckpointing and repointing brickwork, paired with expert waterproofing, can extend your masonry’s life by decades when applied consistently. The Brick Industry Association recommends routine inspections and timely mortar-joint repairs to catch small issues before they become major structural problems. We believe every homeowner deserves that peace of mind. Protect your brickwork for years to come with our professional masonry waterproofing services.