
Table of Contents
Expansion Joint Caulking Fundamentals for Property Owners
Understanding expansion joint caulking is essential for any property owner concerned with preventing structural damage. These deliberately placed gaps in brickwork are designed to accommodate thermal expansion and contraction, but they become vulnerable entry points for moisture if left unsealed. Regular maintenance of expansion joint caulking helps protect your building’s structural integrity and prevents the costly stress cracks that can develop when masonry cannot move freely.
Selecting the right sealant is critical for long-lasting protection, and industry guidelines from the Brick Industry Association recommend flexible, high-performance products. For most masonry applications, a polyurethane masonry sealant is the preferred choice due to its superior adhesion, durability, and ability to withstand extreme weather. The joint width should typically range from 1/4 to 3/4 inch, with a backer rod installed to maintain the proper sealant depth at no more than half the joint’s width. Property owners should plan to inspect these seals annually, as a general rule of thumb is that caulking will need replacement every five to ten years to keep your masonry watertight and stable.
If you notice failing caulking that is cracking, peeling, or pulling away and leaving gaps, it is time to call a professional for masonry expansion joint repair. Water stains on adjacent brickwork are another clear warning sign. Our team at B&G Tuckpointing is dedicated to a mission of enhancing the appearance and improving the integrity of your house or building, and we are ready to help. If your expansion joints show signs of wear, contact B&G for reliable caulking services near me that protect your property so you can get a quote tailored to your specific needs.
Understanding Expansion Joint Caulking and Its Purpose
Expansion joints are deliberate gaps built into masonry walls, sidewalks, and structural elements that allow materials to naturally expand and contract as temperatures change. Without these carefully planned breaks, brick and concrete would crack under the stress of thermal movement or settlement, leading to serious structural damage over time. We fill these critical gaps through expansion joint caulking–a specialized technique that uses flexible sealants capable of stretching and compressing while maintaining a watertight, debris-resistant barrier.
The main purpose of sealing masonry joints is twofold: first, to prevent moisture from seeping behind the wall system where it can cause hidden deterioration, and second, to preserve the joint’s ability to move freely. When water enters an unsealed expansion joint and freezes, the resulting pressure can fracture surrounding brick and mortar, accelerating the need for masonry expansion joint repair. A properly selected and applied sealant absorbs the daily cycle of expansion and contraction, safeguarding your building’s long-term integrity.
Choosing the correct sealant hinges on understanding joint movement, surface adhesion, and weather exposure. The three materials professionals rely on most are polyurethane, silicone, and butyl, and each behaves differently in real-world conditions. The most critical factor is movement capability–the sealant’s ability to stretch without losing its bond to the masonry. Below, we compare these options to help you see which product aligns with your project’s demands.
| Sealant Type | Best For | Cure Time | Flexibility | Paintable |
|---|---|---|---|---|
| Polyurethane | High-movement joints, concrete surfaces | 24-48 hours | Excellent | Yes |
| Silicone | Low-movement joints, glass/metal | 24 hours | Good | No |
| Butyl | Temporary repairs, low-stress areas | 7+ days | Moderate | Yes |
A polyurethane masonry sealant stands out for most brick and concrete applications because it delivers excellent flexibility, bonds aggressively to porous surfaces, and accepts paint once cured–an advantage when matching a building’s finished look. While silicone adheres well to glass and metal, its inability to be painted makes it less versatile for visible masonry work, and butyl’s slow cure time relegates it mainly to short-term patches. As the Concrete Masonry and Hardscapes Association outlines in its joint design guidelines, matching the sealant’s movement capability to the expected joint movement is essential for preventing premature failure, and polyurethane consistently meets those demands in high-movement scenarios.
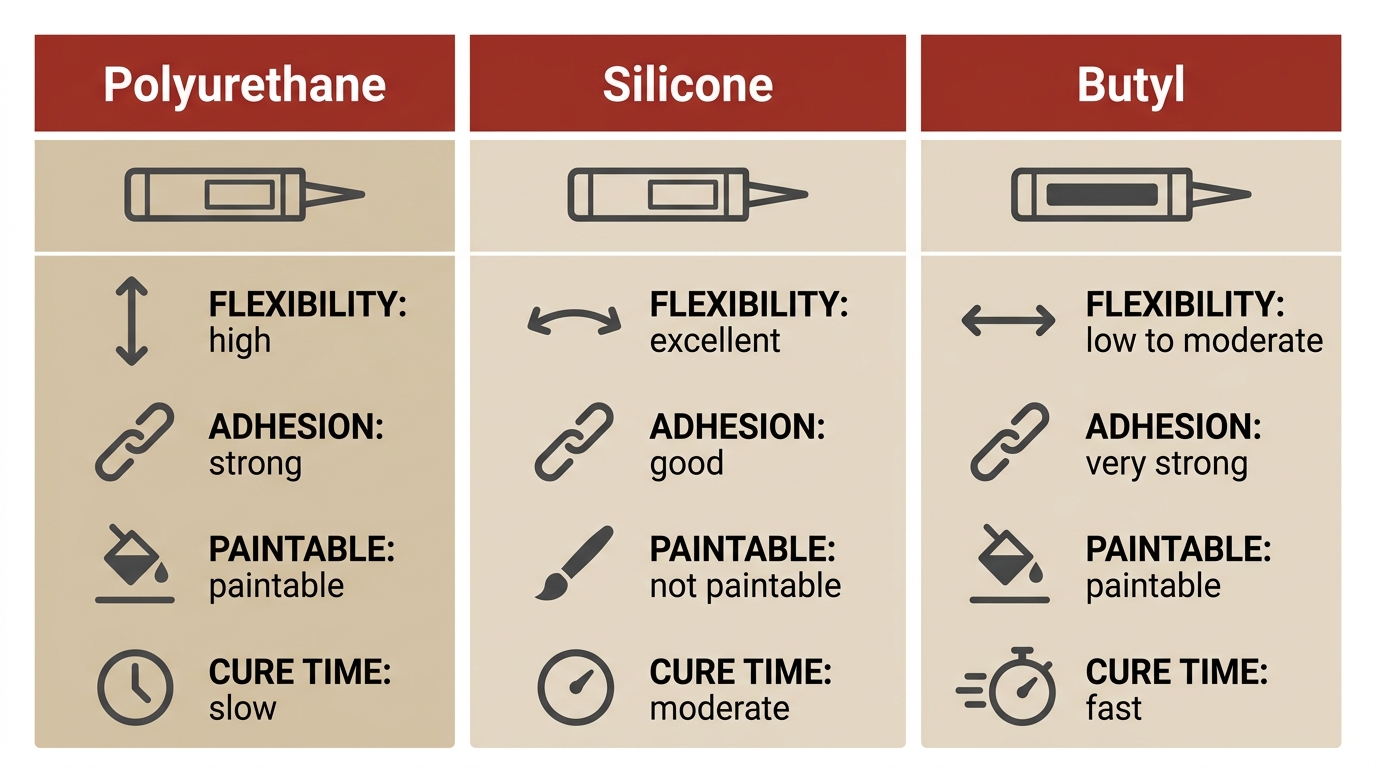
Expansion joint sealants compared: polyurethane, silicone, butyl.
No matter which sealant you choose, correct preparation and application are what make the system last. Improperly cleaned joints or the wrong sealant-to-substrate pairing can lead to early cracking, latent water damage, and expensive reconstruction–exactly the outcomes expansion joints are meant to prevent. The Brick Industry Association’s technical notes reinforce that sealant compatibility with brick veneer and structural clay masonry is non-negotiable for lasting performance. For lasting results on your masonry structure, trust our team for professional caulking and waterproofing services. We combine industry training with decades of field experience so you get a seal that protects your property and preserves its appearance year after year.
Polyurethane Masonry Sealant vs. Silicone for Expansion Joints
Having established why expansion joints are critical, the next decision is which sealant material to use–and the choice often comes down to polyurethane vs. silicone. The right expansion joint caulking material will prevent water intrusion while accommodating the natural movement that occurs in brick and concrete walls, without sacrificing the appearance of your building. We’ll walk you through the key differences so you can make an informed decision for your next project.
Polyurethane and silicone are the two top choices for masonry expansion joints, but each has distinct trade-offs. The table below breaks down the key differences.
| Property | Polyurethane | Silicone |
|---|---|---|
| Movement Capacity | ±25% to ±50% | ±25% to ±50% |
| Adhesion to Concrete | Excellent (no primer often needed) | Good (usually requires primer) |
| UV Resistance | Moderate (may chalk over time) | Excellent |
| Paintable | Yes | No |
| Cure Time (full) | 48 hours | 24 hours |
Choose polyurethane when paintability or strong adhesion to concrete without primer is needed. Choose silicone when maximum UV resistance and faster cure are priorities.
How Polyurethane and Silicone Compare in Flexibility and Adhesion
Both polyurethane and silicone sealants offer impressive movement capacity, typically ranging from ±25% to ±50%. This means the joint can expand and contract significantly without tearing the sealant, a critical function for any masonry joint filler. Where these two materials begin to differ is in how they bond to the substrate. According to industry guidelines from the International Masonry Institute, polyurethane delivers excellent adhesion to concrete and can often be applied without a separate primer, simplifying the installation process.
Silicone, by contrast, usually requires a primer to achieve a reliable bond on porous masonry surfaces, as noted in technical resources from the Brick Industry Association. This extra step can influence the speed of a project, but the reward is a highly flexible seal that remains intact through thermal movement. When our team evaluates a project, we consider the specific substrate and exposure of the joint to recommend the best polyurethane masonry sealant or silicone option for your building.
Cure Times and Application Differences
Cure time is often a deciding factor in choosing the right expansion joint caulking. Silicone sealants typically reach a full cure in about 24 hours, allowing for a quick turnaround on projects where exposure to the elements is imminent. Polyurethane sealants require a longer full-cure window of approximately 48 hours, meaning they need a longer period of dry weather to set properly before rain or heavy moisture arrives.
Temperature and humidity also play a role during the application of a sealant for brick expansion joints. Polyurethane cures by reacting with moisture in the air, so it actually performs well in moderate humidity. Silicone releases a curing agent as it dries, and it can be more forgiving across a wider temperature range. On a vertical wall, properly tooling a concave bead is essential to prevent sagging, regardless of the sealant chosen. Our decades of experience allow us to manage these variables seamlessly, ensuring the sealant cures as intended.
Why Professional Application Matters for Long-Term Performance
Even the highest-quality polyurethane masonry sealant will fail early if the joint isn’t prepared correctly. Professional application ensures that every cavity is cleaned of dust, old mortar, and loose debris. In some cases, light etching is required to open the pores of the masonry for a superior bond. We then apply the material to meet the industry-standard depth-to-width ratio of 2:1, which maximizes the ability of the elastomeric joint compound to stretch and recover without tearing.
At B&G Tuckpointing, we’ve spent over two decades refining our masonry expansion joint repair process to deliver lasting results. Proper tooling is just as important as the material itself: working the sealant into a concave shape directs water away from the joint and creates a neat, professional finish. For long-lasting results, rely on professional masonry restoration services like B&G Tuckpointing to handle the proper preparation and tooling. Our mission is to provide an outstanding level of service that truly enhances the appearance and improves the integrity of your house or building.
Once you’ve chosen the right sealant, proper application is key–which we’ll cover next.
Recognizing Signs of Failing Expansion Joints and Planning Repairs
Now that you understand why expansion joint caulking can fail, let’s look at the specific signs that replacement is needed. Recognizing when expansion joint caulking has failed is the first step toward preventing water intrusion and costly structural damage. Our team sees that many property owners miss the early warning signs, and we want to help you catch problems before they escalate.
Visible Indicators That Caulking Needs Replacement
When you walk around your building, a few visual cues tell you it’s time to plan for masonry expansion joint repair. The most common is cracking, which can range from hairline surface fissures to wide splits that expose the joint interior. Peeling or adhesion loss occurs when the sealant pulls away from one or both sides of the joint, breaking the watertight seal. Hardening and loss of flexibility mean the material can no longer stretch and compress with thermal movement, which leads to tearing. Gaps between the caulk and the joint sides are another clear indicator that the bond has failed. You may also notice crumbling or powdering sealant, especially in older polyurethane applications exposed to years of UV radiation. If you spot any of these conditions, a closer inspection is warranted to prevent moisture from reaching the substrate behind the masonry.
The Role of Backer Rods in Effective Joint Repair
Industry guidelines from the Concrete Masonry and Hardscapes Association emphasize that a backer rod is essential for durable joint restoration. This closed-cell foam strip serves three critical functions. First, it controls sealant depth by providing a firm base that establishes the recommended 1:2 width-to-depth ratio, which allows the sealant to stretch properly without tearing. Second, the backer rod prevents three-sided adhesion by ensuring the sealant bonds only to the two joint sides, not to the back of the joint. When sealant adheres on three sides, it cannot move freely and will tear prematurely. Third, the rod acts as a release agent, creating a bond-breaking surface that permits independent movement. The International Masonry Institute advises that skipping the backer rod or installing it at an incorrect depth is a common cause of premature sealant failure, even when a high-quality polyurethane masonry sealant is used.
Steps for Proper Expansion Joint Restoration
A systematic approach to masonry expansion joint repair yields lasting results. We recommend following these seven steps every time.
- Inspect and measure joint dimensions to determine the correct backer rod diameter and sealant depth.
- Remove old caulk with a joint saw or grinder, taking care not to damage the brick edges.
- Clean thoroughly using a wire brush followed by compressed air to remove all dust and debris.
- Install backer rod to the proper depth, ensuring it is uniformly seated without twisting or stretching.
- Apply primer if the sealant manufacturer’s specifications require it for the substrate.
- Apply new sealant–we typically use a high-performance polyurethane masonry sealant–with a professional-grade caulk gun, filling the joint evenly.
- Tool the sealant immediately with a spatula or trowel to press it against the joint sides, eliminate air pockets, and achieve a smooth, concave finish.
For large or complex jobs, trust our nationwide commercial masonry services to get the job done right.
Proper restoration keeps your joints performing for years, but not all approaches are equal. The following table compares typical DIY results with what our professional team delivers.
| Aspect | DIY Repair | Professional Repair |
|---|---|---|
| Surface Preparation | May skip crucial cleaning/primer steps | Thorough cleaning and priming per manufacturer specs |
| Sealant Application | Uneven depth and coverage | Controlled depth and smooth finish |
| Lifespan | 2-5 years | 10-20 years |
| Cost | Lower upfront | Higher upfront but better long-term value |
| Warranty | None | Often includes workmanship warranty |
DIY efforts frequently skip the primer step or install the backer rod at an inconsistent depth, leading to uneven sealant coverage and a lifespan of only two to five years. Professional preparation and application yield a controlled depth, an even finish, and a service life of ten to twenty years, often backed by a workmanship warranty. While the upfront cost is higher, the long-term value of professional restoration is clear when you factor in reduced frequency of repairs and better protection against water damage.
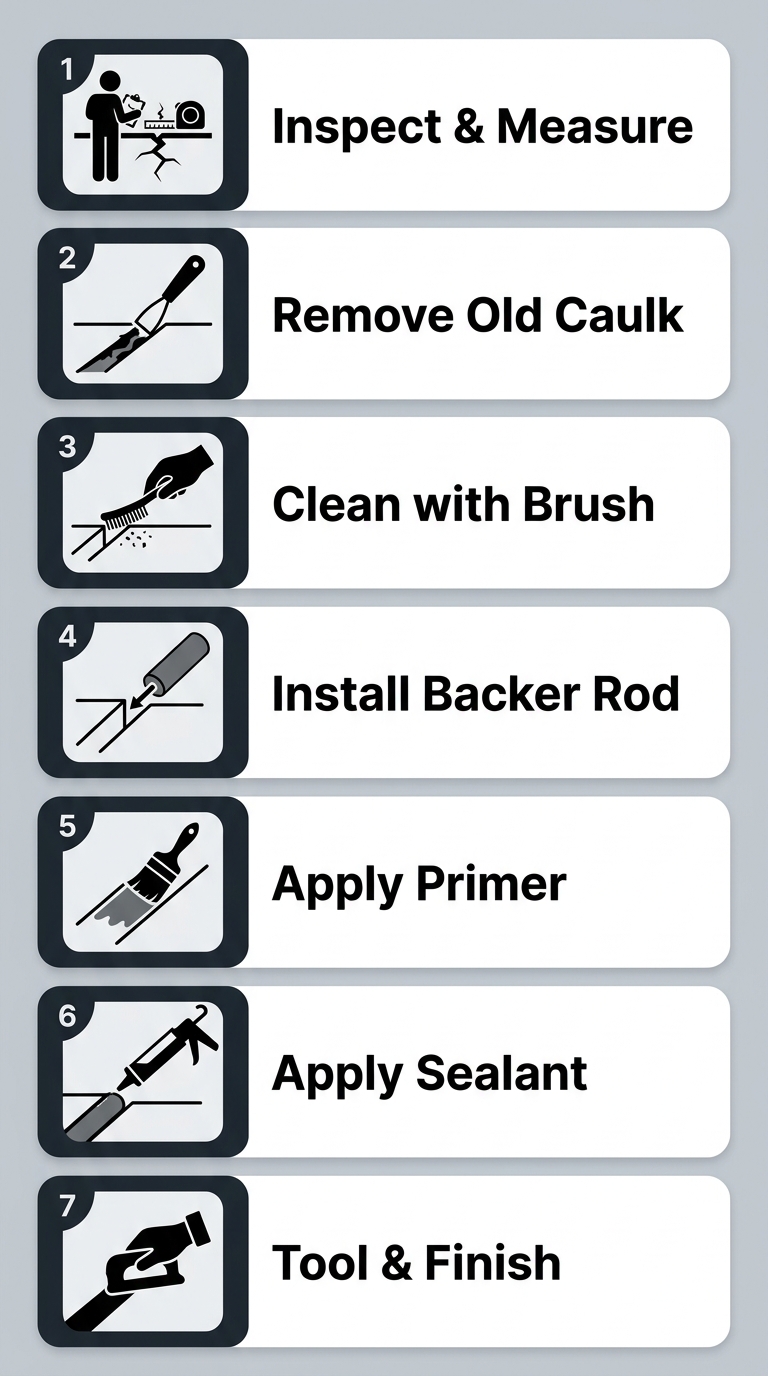
Seven-step expansion joint restoration process diagram
Once you’ve identified failing joints, proper restoration keeps them performing for years–and our team is ready to help nationwide. We aim to enhance the appearance and improve the integrity of your house or building. If you see any of the warning signs described above, we encourage you to reach out for a professional evaluation. Get A Quote today and let us put our experience to work protecting your property.
Best Practices for Long-Term Expansion Joint Maintenance
Now that you understand the role of expansion joints, let’s explore best practices for keeping them in top shape for years to come. Proper expansion joint caulking is essential for preventing water intrusion and maintaining your building’s structural integrity. Our maintenance tips focus on proactive care that saves you money over time.
The frequency of expansion joint inspections depends heavily on how your building is used and the climate it endures. As the Brick Industry Association notes, different structures face unique stress patterns that dictate maintenance schedules. The table below summarizes the recommended inspection and replacement intervals for common building types:
- Residential: Annually | 10-15 years
- Commercial Low-Rise: Biannually | 7-12 years
- Commercial High-Rise: Quarterly | 5-10 years
- Historic Building: Annually with expert assessment | 10-20 years with spot repairs
Consistent maintenance can significantly extend the life of your sealant and prevent costly water damage. Simple tasks like cleaning debris and checking adhesion prevent minor issues from becoming major masonry expansion joint repair projects. By sticking to a regular schedule, you protect your investment and avoid premature failure of the joint material.
We recommend a proactive approach to ensure your building envelope remains watertight. Here are three best practices to incorporate into your routine:
- Keep joints clean: Remove dirt, debris, and any vegetation that begins to grow in the joint. This prevents physical blockages and ensures water can drain properly.
- Inspect sealant edges: Check for peeling, cracking, or any loss of adhesion where the material meets the brick. Polyurethane masonry sealant is a flexible and durable common choice, but even it requires monitoring.
- Address separation immediately: If you notice the sealant pulling away from the masonry, act fast. Even a small gap can let in moisture, leading to internal wall damage and much bigger repairs down the line.
To catch problems before they worsen, we also suggest scheduling inspections during the spring and fall, right before the most extreme temperatures arrive. With a solid maintenance plan, your expansion joints will perform reliably for their full lifespan. Ready to schedule your inspection? For reliable long-term performance, trust B&G Tuckpointing for solid tuckpointing services tailored to your building’s needs. Contact us for a custom quote today.
Common Questions About Expansion Joint Caulking
What is expansion joint caulking? Expansion joint caulking is a flexible sealant applied in masonry joints to accommodate natural building movement and prevent water intrusion. This protective barrier keeps moisture from seeping behind brickwork, where it can cause costly deterioration over time. We aim to enhance the appearance and improve the integrity of your building through proper joint sealing.
What material is best for masonry joint sealing? For durability and flexibility, we use polyurethane masonry sealant in expansion joints. This material withstands the significant temperature swings and freeze-thaw cycles common in the St. Louis, MO region, maintaining a watertight seal as your structure expands and contracts. Its elasticity makes it the preferred choice for long-lasting protection.
How long does expansion joint caulking last? In climates like Missouri’s, caulking in expansion joints typically lasts between five and ten years. Factors such as sun exposure and severe weather can shorten this lifespan, so regular inspections are key. Addressing wear early helps you avoid more extensive masonry expansion joint repair down the road.
Does expansion joint caulking relate to chimney maintenance? Yes, chimneys are highly exposed masonry structures that benefit greatly from properly caulked expansion joints. If you are also concerned about your chimney’s joints, our chimney repair services address both caulking and structural issues to keep your entire system sound.
What are signs that caulk needs replacement? Cracking, crumbling, or visible gaps in the sealant are clear indicators that your expansion joint caulking has failed. Once the seal is compromised, water can penetrate the masonry and lead to internal damage. Prompt replacement restores the protective barrier and preserves your structure’s integrity.
Ready to address your expansion joint needs? Contact us for a custom quote based on your structure’s size and job complexity.
Protect Your Property with Professional Expansion Joint Caulking
To protect your masonry investment, professional expansion joint caulking is essential for preventing cracks and water damage in the gaps that allow brick to move naturally. We use a premium polyurethane masonry sealant that offers superior flexibility and long-term durability compared to standard caulks, ensuring lasting protection against the elements.
Neglecting masonry expansion joint repair can lead to costly foundation issues, spalling, and extensive restoration work. B&G’s mission is to provide residential and commercial customers with an outstanding level of service, and with two decades of experience serving properties nationwide, we aim to enhance the appearance and improve the integrity of your house or building. In-house financing is available to make your project accessible. Contact B&G today to Get A Quote for your expansion joint caulking project.