
Table of Contents
Understanding Residential Tuckpointing for Your Home
Residential tuckpointing is the process of carefully removing crumbling or damaged mortar from brick joints and replacing it with fresh, color-matched mortar, restoring your home’s structural integrity and curb appeal. When mortar begins to fail, moisture can seep into your brickwork, causing cracks and instability that only worsen over time. Ignoring these early warning signs can lead to extensive and expensive structural damage.
Crumbling mortar, water stains on interior walls, and visibly loose bricks are clear signs your home may need professional attention. According to the Brick Industry Association, timely mortar joint repair is essential to prevent deterioration. While brick repointing focuses on replacing mortar, residential tuckpointing also blends a precisely matched color for a seamless finish. The Association for Preservation Technology International notes that brick joint renewal through tuckpointing is a proven way to extend the lifespan of both modern and historic homes. Addressing failing mortar early prevents costly foundation issues, protects against water damage, and restores your home’s curb appeal.
With over 20 years of masonry expertise, we provide tuckpointing nationwide and offer in-house financing to make your mortar restoration both affordable and precise. Understanding what residential tuckpointing involves is the first step. Next, we show how our team brings this expertise directly to your home. Ready to get started? Get A Quote today and let us help preserve your brickwork for decades to come.
The Basics of Residential Tuckpointing and Mortar Joint Care
Understanding residential tuckpointing is key to protecting your brick home’s exterior. Mortar joints seal out moisture and maintain structural integrity, but they naturally wear over time. Cracks, crumbling, or missing mortar let water in and lead to costly damage. Catching these issues early through regular inspection and care prevents bigger problems.
Tuckpointing itself is a cosmetic and protective technique in which a thin layer of colored mortar is applied over the existing joints to imitate fine, uniform lines. It refreshes your brickwork’s appearance and provides an extra barrier against water, but it doesn’t replace the full joint depth. The underlying mortar must still be sound. According to the Brick Industry Association, proper tuckpointing involves precise color matching for seamless results. At B&G Tuckpointing, we bring over a decade of experience to every project, ensuring the new mortar blends perfectly with your original brickwork. When the joints are intact but the surface has faded, residential tuckpointing is a smart investment.
While tuckpointing improves the look and weather resistance of brick walls, brick repointing involves removing and replacing old mortar throughout the joint depth, restoring structural integrity. To help you understand the differences, here is a quick comparison:
| Aspect | Tuckpointing | Repointing |
|---|---|---|
| Definition | Applying a thin layer of colored mortar over existing joints to imitate narrow joints and enhance appearance. | Removing damaged mortar and replacing it with new mortar throughout the joint. |
| Aesthetic outcome | Creates the look of fine joints and uniform brickwork; often used for historic facades. | Restores structural integrity and matches original mortar appearance. |
| Mortar application | Applied only to the surface of existing mortar joints. | Removes old mortar to a depth of at least half the joint thickness before filling. |
| When to choose | Surface fading or cosmetic refresh needed; joints still sound. | Joints are cracked, crumbling, or missing mortar; structural repair needed. |
In short, if your joints are sound but the surface has faded, tuckpointing can rejuvenate the appearance and add a protective layer. However, if you notice cracks, crumbling, or missing sections, repointing is essential to restore your home’s structural strength. This distinction helps you choose the right service and avoid unnecessary expenses.
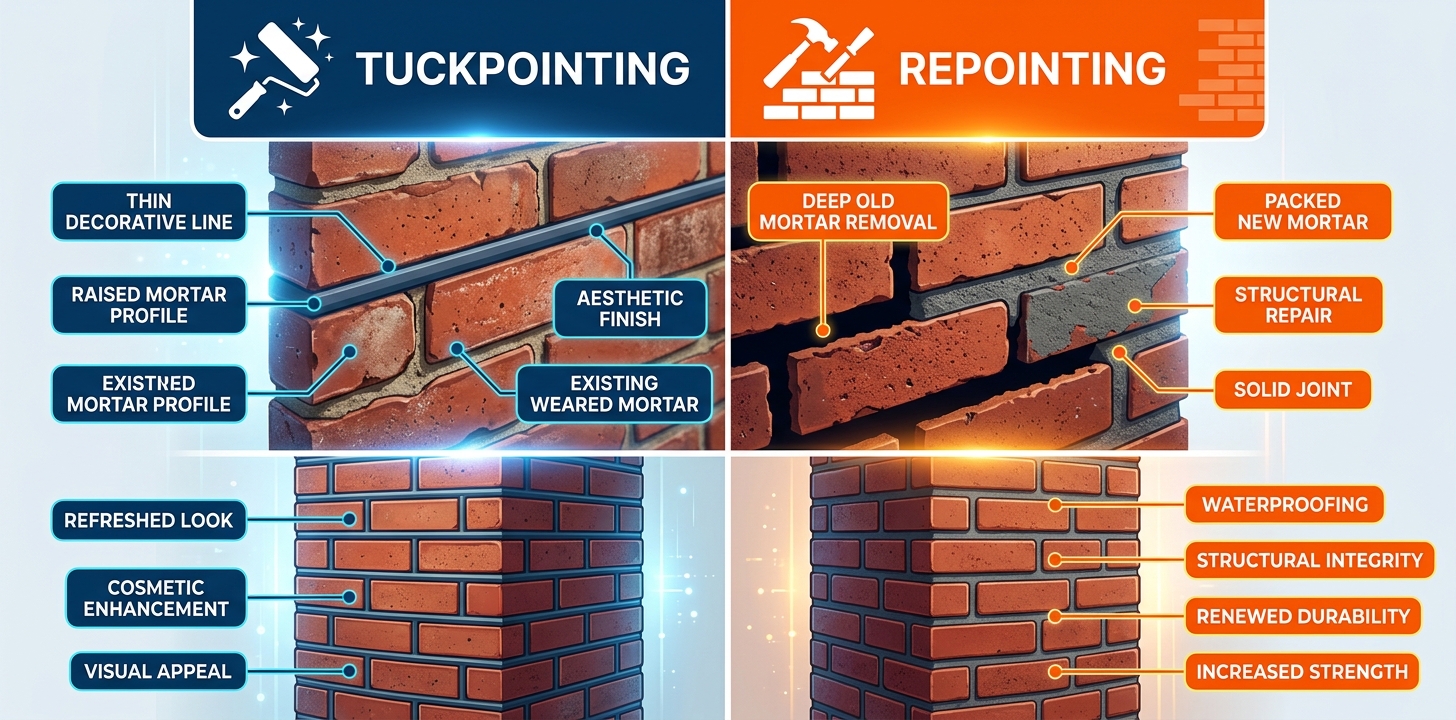
Tuckpointing and repointing differences for masonry care
Regardless of the technique, regular mortar joint repair for your home is crucial. Water infiltration is the leading cause of mortar decay, especially in freeze-thaw regions where freezing water expands and cracks the mortar. We advise pairing any tuckpointing or repointing work with waterproofing and caulking to keep moisture at bay. A quick annual inspection — looking for hairline cracks, efflorescence, or soft mortar — can catch small problems before they turn into major repairs. At B&G Tuckpointing, we aim to enhance the appearance and improve the integrity of your house or building with durable, color-matched solutions.
If you suspect your mortar joints need professional attention, look up tuckpointing near me to find trusted masons like B&G Tuckpointing.
The Tuckpointing Process: Techniques, Materials, and Longevity
When it comes to residential tuckpointing, understanding the full process can help you appreciate the value of professional masonry care. Solid tuckpointing is the gold standard for restoring brickwork’s strength and weather resistance–here’s what the process involves. Now let’s walk through the actual tuckpointing process from start to finish.
The Step-by-Step Tuckpointing Process
Every thorough brick repointing job begins with joint preparation. Using a grinder or chisel, we carefully cut out deteriorated mortar to a depth of at least two-thirds the brick thickness, then clean the joint with a stiff brush or compressed air to remove all dust and debris. Next, we mix the new mortar in small batches to match the original material’s strength–softer mortars are safer for historic brick, while modern Type N formulas work well on most exterior walls. The fresh mortar is applied in layers, pressing it firmly into the joint to eliminate air pockets. Once in place, we tool the joint to create a consistent profile, typically a concave finish that sheds water effectively. Curing takes about 24 to 48 hours, during which the mortar is kept slightly moist to prevent cracking and ensure a durable bond. This step-by-step approach–combined with B&G’s 20 years of masonry experience–extends the life of brickwork by decades when done correctly.
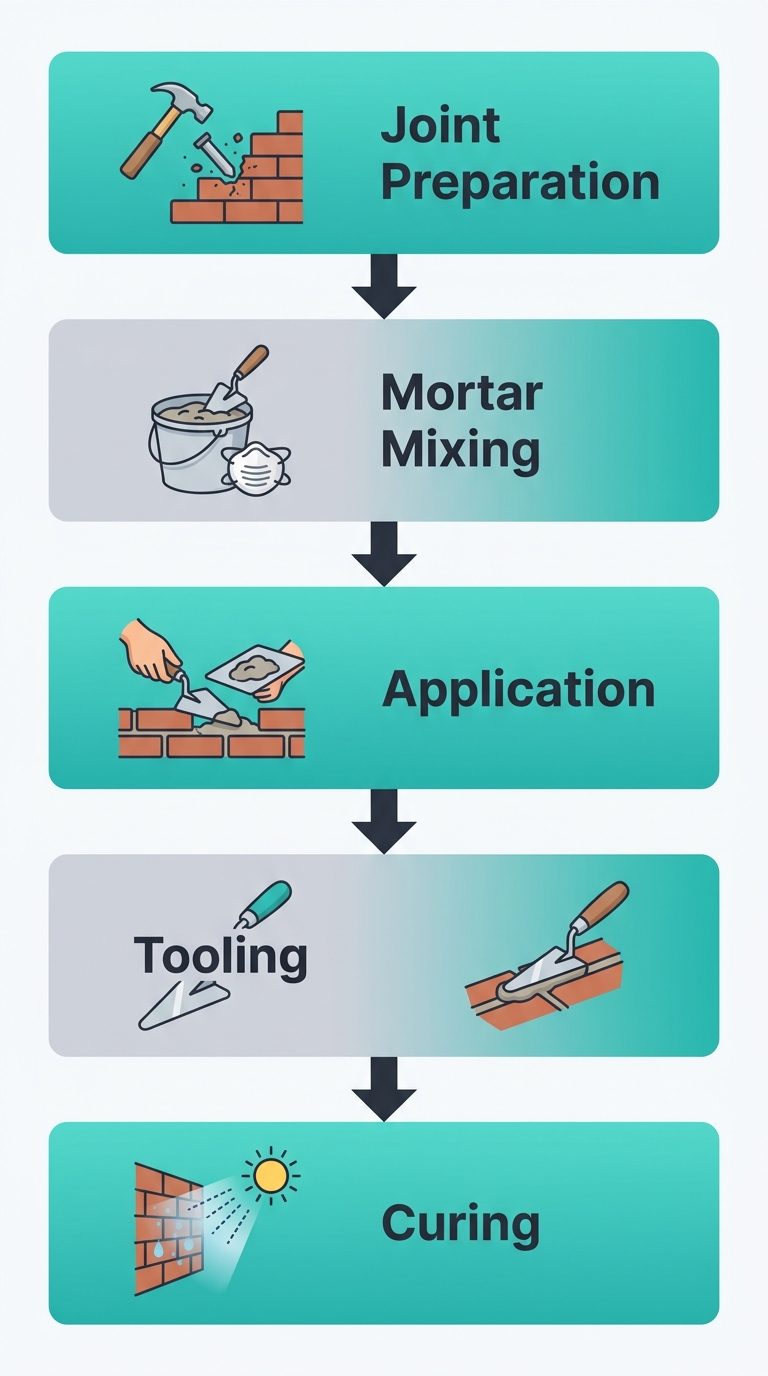
The professional tuckpointing process in five steps
With the steps clear, choosing the right mortar is the next critical decision.
Selecting the Best Mortar Mix for Your Brickwork
Mortar selection directly affects the longevity of your tuckpointing repair. According to the Brick Industry Association, Type N mortar–with a compressive strength of 750 psi–is the general-purpose standard for above-grade exterior walls and offers good freeze-thaw resistance. For most residential tuckpointing in St. Louis, Type N provides the ideal balance of strength and flexibility. Type S mortar (1,800 psi) is suited for below-grade applications, chimneys, or areas under heavy load, while Type O (350 psi) is reserved for soft, historic bricks that could be damaged by stronger mixes. Matching the existing mortar’s strength is essential; using a mortar that is too hard can trap moisture and cause the brick faces to spall. We always test a small batch before full application to confirm the mortar behaves like the original.
To help you choose, here is a quick comparison of common residential mortar types.
| Mortar Type | Compressive Strength (psi) | Best Use | Color Range |
|---|---|---|---|
| Type N | 750 | General purpose; most common for exterior above-grade walls; good freeze-thaw resistance. | Wide range (white, gray, buff, custom matches). |
| Type S | 1800 | Structures requiring high bond strength; below-grade applications; heavy loads. | Limited; typically gray tones. |
| Type O | 350 | Interior non-load-bearing walls; historic restoration where soft brick needs low-strength mortar. | Limited; often matched to historic lime mortars. |
Type N offers the best blend of durability and versatility for the vast majority of residential tuckpointing projects in the St. Louis area. Type S is valuable for specific high-stress conditions, while Type O remains indispensable for older homes with softer masonry. Once you’ve selected the appropriate mix, the next step is making the repair virtually invisible.
Color Matching and Joint Profiles for a Seamless Finish
Achieving a seamless look during a mortar joint repair starts with precise color matching. The Association for Preservation Technology International notes that successful matching relies on blending pigments and different sand gradations on-site, then testing a small, hidden area before proceeding with the full job. At B&G, our spot tuckpointing and color-matching expertise ensures that even partial repairs blend perfectly with the original mortar. After the color is dialed in, we focus on joint profile. The concave profile is the workhorse of weather-resistant brickwork; it compacts the mortar against the brick edges and sheds water more effectively than flush or V-joint profiles. By replicating the original joint style and tint, we create a finish that looks original while performing better than before.
How Proper Tuckpointing Prevents Water Damage
Compromised mortar joints act like open channels, allowing rainwater to penetrate the wall and saturate the brick. When that trapped moisture freezes, it expands and causes spalling–the flaking and crumbling of brick faces that accelerates deterioration. Over time, this intrusion can lead to damp interior walls, mold growth, and even structural weakening. Proper tuckpointing–including thorough joint preparation and the correct mortar selection–restores a watertight seal that stops moisture at the surface. Effective mortar joint repair creates a continuous barrier against the elements, protecting your home from freeze-thaw cycles and the costly damage they bring. With every joint sealed and color-matched, your brickwork regains its ability to manage water, preserving both its appearance and its integrity for years to come.
Understanding the process helps you recognize why professional work is worth the investment–next, we’ll look at the signs that your home needs tuckpointing.
Inspecting Your Brickwork and Understanding the Cost of Tuckpointing
A Step-by-Step Inspection Guide for Homeowners
Once you understand what tuckpointing entails, the next step is inspecting your own brickwork for residential tuckpointing needs. Start by walking around your home and examining mortar joints closely. Look for mortar that crumbles when touched, cracks wider than 1/4 inch, or white, chalky efflorescence on the brick surface. These are clear signs that moisture has penetrated and weakened the mortar. Pay attention to gaps between the brick and mortar–these openings let water seep behind the wall. Next, check interior walls on the same side as exterior brick. Damp spots, peeling paint, or musty odors indicate moisture intrusion. According to the Brick Industry Association, correct joint preparation and depth are critical for long-lasting repairs. Identifying these issues early makes mortar joint repair simpler and more cost-effective. We recommend taking photos and notes to share with a professional tuckpointing contractor for an accurate assessment.
Factors That Influence Residential Tuckpointing Costs
While every home is different, residential tuckpointing costs generally depend on a few key variables. The extent of damage, measured in linear feet of deteriorated mortar joints, is the primary factor. More linear feet means a larger project. Mortar type also plays a role: Type N mortar for softer, older brick and Type S for structural applications each carry different material costs. Accessibility is another consideration–single-story homes are easier to work on than multi-story structures requiring scaffolding or lift equipment, which can increase labor time. At B&G Tuckpointing, we blend custom pigments on-site to match your existing mortar exactly; DIY efforts often result in a mismatched patch that stands out. Brick repointing, sometimes confused with tuckpointing, lacks the two-color aesthetic detail, but our techniques ensure a seamless appearance. Labor rates vary by region, but our team provides transparent pricing with no hidden fees. We offer free, no-obligation quotes and in-house financing to make your project manageable. We Service Tuckpointing Clients Nationwide & Offer In-House Financing!
The Benefits of Hiring a Professional Tuckpointing Contractor
Mortar joint repair is a precision task. We grind joints to the correct depth–at least 3/4 inch–and tool them properly for watertight bonding, following industry standards. Our team blends mortar pigments on-site to match existing color seamlessly. For historic brick, we follow guidance from the Association for Preservation Technology International to ensure mortar is softer than the brick, preventing damage. This compatibility is essential for long-term preservation. DIY repairs often fail in 1-3 years due to shallow joints or wrong mortar strength; our work carries a 5-year warranty and we cover any workmanship issues. We use dust containment and full safety protocols, protecting your property and health. If you’re ready to protect your home, find a trusted tuckpointing company near me for a free estimate. B&G Tuckpointing’s mission is to provide outstanding service, and we back every project.
The table below highlights why professional tuckpointing outlasts and outperforms DIY attempts. Whether you’re matching mortar color or ensuring proper joint depth, expert assessment makes a significant difference.
| Factor | DIY | Professional |
|---|---|---|
| Quality of mortar match | Often mismatched color and strength due to lack of testing; may damage brick. | Precise color matching through custom blending; mortar strength tested for compatibility. |
| Expertise in joint preparation | Risk of insufficient joint depth or damaging brick edges. | Proper grinding depth and tooling for correct bond and appearance. |
| Longevity of repair | May last 1-3 years if done incorrectly; early failure common. | 10-20 years or more when done per industry standards. |
| Cost and time | Lower upfront material cost but high risk of rework; significant time investment. | Higher upfront but includes free quote, warranty, and financing; efficient completion. |
| Safety and equipment | Limited access to scaffolding, dust containment, and PPE; hazard of silica dust. | Full safety protocols, proper mixing tools, and cleanup included. |
These differences show why professional work is a better long-term investment.
Long-Term Value: Preventing Damage and Increasing Home Value
Investing in proper tuckpointing prevents much more expensive damage. Water that seeps through failing mortar can rot framing and sheathing, leading to costly repairs. Professional tuckpointing seals the envelope and stops moisture intrusion. Beyond protection, freshly pointed brick significantly boosts curb appeal. Industry observations suggest a well-maintained brick exterior can increase resale value by 5-10%. At B&G Tuckpointing, we aim to enhance the appearance and improve the integrity of your house. Now that you know what to look for and the factors that affect cost, you are ready to get a custom quote and schedule your professional assessment–Get A Quote today!
Special Considerations: Seasonal Repairs, Waterproofing, and Chimney Care
Beyond the basic tuckpointing process, weather, waterproofing, and chimney condition greatly affect the outcome. In residential tuckpointing, addressing these factors early ensures durable results.
Winter tuckpointing is only advisable for emergencies. According to the Brick Industry Association, mortar must stay above 40°F and be protected from freezing for at least 24 hours. For urgent winter damage, hire an experienced tuckpointing contractor like B&G to apply special heated enclosures. However, most projects are better suited to summer, when natural hydration occurs without extra precautions.
The table below highlights the main seasonal differences.
Comparison Table: Seasonal Tuckpointing Considerations
| Condition | Winter Repair | Summer Repair |
|---|---|---|
| Mortar curing temperature | Requires heated enclosures and mortar heated above 40°F; specialized techniques needed. | Standard temperatures promote proper hydration; no special heating needed. |
| Freeze risk | High; mortar must be protected from freezing for at least 24 hours. | Low; mortar cures without freeze threat. |
| Preferred timing | Emergency repairs only; full projects better postponed. | Ideal for most tuckpointing projects. |
| Cost implications | May incur extra charges for heating, enclosures, and scheduling. | Standard pricing; competitive quotes available. |
As shown, summer provides ideal curing conditions, while winter repairs require costly measures and are best reserved for emergencies. We recommend planning large projects for warmer months and getting a custom quote for any urgent needs.
Waterproofing is essential after brick repointing. Applying a breathable sealant stops moisture penetration and prevents freeze-thaw damage. Our waterproofing and caulking services protect your masonry long-term.
Chimney mortar joint repair is equally important. Chimneys face harsh weather, so proper mortar joint repair prevents leaks and structural issues. B&G’s chimney repair includes repointing and preventative maintenance.
We tailor solutions to your property. B&G’s mission is to provide residential and commercial customers with an outstanding level of service. We Service Tuckpointing Clients Nationwide & Offer In-House Financing! We aim to enhance the appearance and improve the integrity of your house or building. Get A Quote today.
Common Tuckpointing Questions Answered
Now that you understand why tuckpointing matters, let’s answer common questions property owners ask.
What is residential tuckpointing?
Residential tuckpointing is a specialized finish technique that applies fine, color-matched mortar lines to create crisp, clean joints on brick homes. It provides cosmetic enhancement and weather protection, making it different from brick repointing, which is general mortar replacement, and mortar joint repair, which focuses on damage fixes.
How long does tuckpointing last?
With proper materials and workmanship, tuckpointing lasts 15-30+ years. We use high-quality materials and offer preventative maintenance to extend that lifespan.
Can you match existing mortar color exactly?
Yes, our spot tuckpointing and color-matching expertise ensures a seamless repair. We create custom mortar blends to match your existing brickwork perfectly.
Is tuckpointing only for old buildings?
No, both older and newer structures benefit. Tuckpointing restores integrity and appearance for any building.
Do you offer residential tuckpointing nationwide?
We Service Tuckpointing Clients Nationwide & Offer In-House Financing! Get a custom quote today.
Protect Your Home with Professional Tuckpointing Services
Beyond simple repairs, professional residential tuckpointing actively protects your home from water damage. Unmaintained mortar joints let moisture seep in, causing spalling brick, damp basements, and structural issues–making professional mortar joint repair essential. Our masons use compatible mortar and precise techniques to restore weather resistance without damaging existing brick.
With over 20 years of masonry experience, B&G Tuckpointing delivers expert brick repointing backed by APTI guidelines. We aim to enhance the appearance and improve the integrity of your house or building. Our nationwide team offers in-house financing to make restoration accessible. For professional masonry repair near me, homeowners trust B&G. That protection starts with the right technique and materials.